Chicken on a Stick. I was really excited about this recipe because
1. My kiddos love (and eat) chicken without complaint
2. Chicken is cheap (and easy to find)
3. I felt comfortable with this ingredient.
So on with the chicken...on a stick. The first thing to do was to make the marinate which includes the following: peanut butter, garlic, ginger, coconut milk, hoisin sauce, lime juice and sesame oil. I was so happy to have all of these ingredients at the "regular" grocery store. :)
 Next was to prepare the chicken. This recipe called for a mallet (which I don't have) in order to pound the chicken breast into a 1/4 inch. I did this in between 2 pieces of plastic wrap and a rolling pin. This was super fun for my aggression but then I realized that I pulverized the chicken in the process. The ends of the chicken were mushy. I then cut the chicken into 1 inch strips so they could be put onto the "sticks". We (I enlisted my awesome husband for this) put the chicken into the bag and then placed the marinate over it. And then off to the fridge for 2 hours.
Isn't he so cute. :) Even with the stache. And for the record, I do not like the stache!
After we put the chicken in the fridge, I decided to sit down and re-read the recipe to know what to do next. Oh No... I did it. The one thing that you MUST do before starting to cook. Read the ENTIRE recipe before you start. Apparently part of the beautiful peanut butter marinate that is currently getting e-coli all over it with RAW chicken was to be set aside for a dipping sauce. I guess we wouldn't be having a dipping sauce. Of course, again my awesome husband assured me that it would still taste great. :)
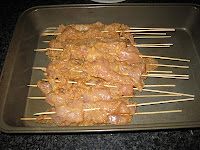
After 2 hours, I took the chicken out and put it onto the "sticks". The mushy chicken became a factor here so I just did my best with the non-mushy chicken.
The next step was to cook!!!! The recipe called for a "cast iron griddle" to a temperature of 275 degrees. Ok, more problems here. For some reason, I thought we were to use a "grill pan" that was cast iron (which I do have) but I wasn't sure how to know when the pan was 275 degrees. My next idea was to use our electric skillet because I could at least set to the temperature and hopefully get a good sear. Remember, searing is the technique we are going for. Of course our electric skillet is non-stick and is NOT cast iron. :( Remember how awesome cast iron is. Ok, I went for the electric skillet. I placed the sticks on and heard a "searing" sound and felt better.
 The recipe calls to leave each stick on for 1 1/2 to 3 minutes per side. After 3 minutes, it did not appear golden brown and each stick was not cooking at the same rate so after 25 minutes of flipping, checking, moving, rotating and flipping some more, we came up with 14 Golden Brown, yummy smelling, beautiful, CHICKEN ON A STICK!!!!
I served with brown rice and green beans!!!!

Results:
1. Not as good (awesome) as we were hoping but at least edible, not raw, chicken and tasty.
2. We were not that hungry which could of course could have been a factor.
3. Reagan probably ate the most chicken out of everyone including Symon. Ryan did point out that he tried it and liked it but wasn't hungry. :)

Things I learned:
1. Do NOT pound the chicken hard. Gentle pounding is fine. Maybe a mallet would be better than a rolling pin.
2. Try to cut the chicken as even as you can in 1 inch strips in order to insure even cooking.
3. Find out a way to measure the temperature of a pan. ( I have seen Alton Brown have this tool that you just shoot some kind of laser at the pan and it tells you the temp.) Apparently if I had this plus used my CAST IRON pan (which is the same as a skillet according to Alton Brown's website) it might have SEARED better. (I looked this up this morning)
4. TOO thick and possibly too much marinate.
Symon and I discussed the idea of having a dipping sauce but we felt this would not have made it better. The searing technique is complete!
SEARING LESSONS LEARNED
1. You must use a cast iron pan!!!! (GET ONE)
2. Don't be afraid of the sizzle sound
3. DON'T MOVE THE FOOD! (if you want a sear and crispy outside)
4. Duck and Tofu are not my favorite eats
5. Tuna is AWESOME!!!!
6. You need to use thin ingredients to insure that the food is cooked through with a searing technique.
7. It is mostly a dry cooking method. (This means you do not use a lot, if any cooking oil in the pan)
I am really excited for the next cooking method!! GRILLING. I am also very thankful I live where it is not cold because grilling in the winter could be bad!!!! Stay Tune!


