Monday, October 24, 2011

The Cost for Prime Rib is WHAT?

I know, I know, I have been MIA. I have been trying some other recipes along with being on a diet. (Although it's not suppose to be called that) If you have ever had prime rib you know that it is not the most leanest meat. But oh is it good. OK so when starting this recipe I was a little nervous because I know if would feed a lot of people and was afraid to make it and not like it. :) This recipe is called "Dry-Aged Standing Rib Roast". I did not know at first that this was what a prime rib was. After talking to my mom she told me what it was. I thought of buffets where the carver guy is cutting off slice by slice with that bloody looking juices running out. I was never a fan of it. It has a lot of fat on it and is usually served rare to medium rare. Two things that sort of gross me out. But on we went to the store to buy the meat!
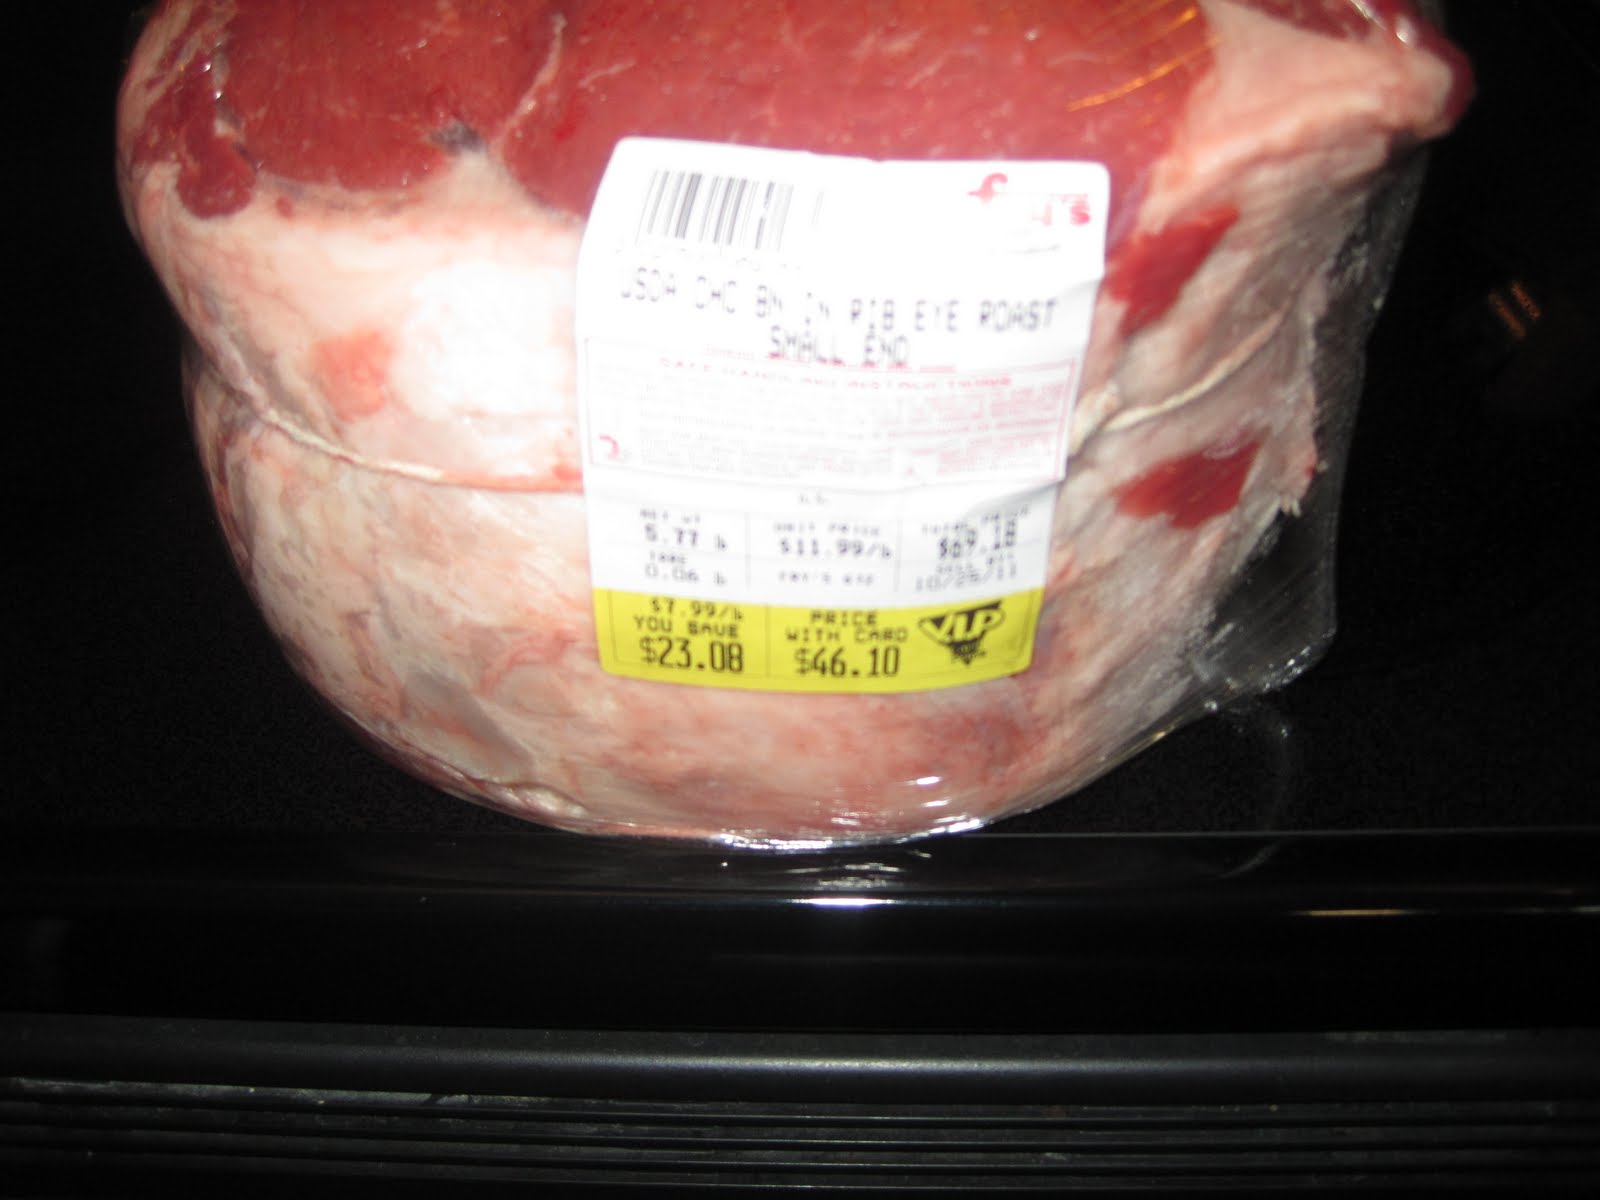
I started at Fry's and looked for a "4 rib bone in standing rib roast". Of course there isn't anything that says those exact words in the prepackaged sections so off to the butcher I go. I kindly asked for the exact description, she smiled and went to the "cold room" to ask if they had any. The butcher say they did, it would be ready if 5 minutes and when dinner was. That's a good sign right? Reagan and I went to look for the other ingredients. When I got back she showed me a hunk a meat and told me it would be $95.00. Holy Cow!!!!! (Literally) I opted for 1/2 (which would be 2 bone) and went to pay $45 dollars for one meal of meat! (That is a lot!!!! Especially the way my kids eat)


The first step was to "age" the meat. My mom told me that most meat is already aged but I must follow the directions. I placed the chunk of meat on several pieces of paper towels and placed it into the fridge on the bottom and left it alone for 3-4 days.


You can do this stage for up to 5 days but Sunday was football day, a perfect day for prime rib. :)

Good Morning Sunday!!! or in our house... sit on our butt and watch football from the time our eyes open until our eyes close! LOL. At about lunch time I took the prime rib out of the fridge and let it come to room temperature which took about 1 hour. While coming to room temperature I set the oven to 250 degrees. I then liberally coated the roast with canola oil, salt and pepper. That is it!!! I know you have those ingredients in your pantry. You can save your money for the roast. :) The roast goes into the oven for 4 hours or until the internal temperature reaches 118 degrees. Beware to put the roast in bone side down to prevent soggy meat.
After the internal temperature is 118 degrees, I removed the roast and cranked the oven temperature up to 500 degrees. (I found this interesting because if you remember with the turkey we did the opposite) I then placed the roast back in the oven to get that yummy crispy crust. Lets be honest. That is why I eat meat!!!

After the beautiful crust is created I removed the roast, placed it on the cutting board and covered with foil to let the meat rest and the juices stay in the meat. (I left it about 30 minutes)
On to the juices. There was a lot of yummy "bits" on the bottom of the pan.

I have to be honest, I have never made homemade gravy of any type. I am the kind of person that opens a package of dry mix, adds water and whisks it. I have always been intimidated by pan sauces of any type but on we went. I placed the roasting pan right on the stove top and de-glazed the pan with 1 cup of water. ( I used a little bit less because I had a smaller roast) I then let it come to a boil and scraped the bits off, added the wine and then removed the liquid to a gravy separator. Honestly, I don't have a gravy separator and just spent the bank on the meat so I wasn't able to go get another tool. I did some searching on google and found other ways to separate gravy. I placed the liquid in a bowl and then let it cool for 15 minutes in the refrigerator. After this the fat comes to the top and then I just used a spoon to slowly and gently remove the grease, oil or whatever it was off the top. This took forever.

After that I placed the liquid back on the stove, added butter and the chopped leek and returned it to a simmer. DONE!!! Lets eat.


Now to cut. I wasn't sure how to start but I can tell you I was already picking off the crust which was yummy! I honestly just starting cutting large slices. I needed to cut them a little thicker than I usually liked because it was hard with my dull knives to cut nice thin slices. I will be honest, some juices ran out and I freaked out but it was still very juicy.

I served with rolls, the pan sauce and roasted cauliflower. Yummy.
Results:


AMAZING!!!! OMG it was like butter. The pan sauce was not that good. It had a raw wine taste which I was not a big fan of. But I could not stop eating the meat. I seriously had like 3 slices and that doesn't count all of the picking of crust I did at the beginning.
I did find it interesting that the turkey was cooked at a high temperature first to create the crispy skin and then at a low heat for the rest of the cooking time but for the roast it was the opposite. Not sure why but all I know is that both turned out some yummy eats. If you know why this is the way it is let me know. In the mean time I will just enjoy the eats. Next up.... baked potatoes. And I promise I won't be gone this long again. :)


Wednesday, September 14, 2011

It's FOOTBALL Season!!!!

It is September and in our house that means two things, the start of the fall season (yes even if it is 100 degrees outside) and FOOTBALL!!!! Now 10 years ago I would say that I was a sports lover. But now I have married into the BEARS cult. Just kidding. I am most definitely a Bears fan. Sorry dad. Its not just the sports but the cheering together as a family for a team and seeing the kids get excited is a great thing. Because this last Sunday was the official start of football season, I felt it was a perfect day to make my next meal. TURKEY! Now if you know my husband, you know his favorite holiday is Thanksgiving. It's weird right? Not to him. Since I met him 13 years ago he has always loved Thanksgiving. He says there is not stress about gifts and it has his 3 favorite Fs. Family, Food, and Football!!! :) He obviously has never made a turkey because the first couple of times I made a turkey, it was STRESSFUL!!!!! To date I think I have mad 3-4 turkeys and I feel like I am getting better every time. This leads us to our new cooking technique. Roasting!!!! Roasting is basically anything in you do in the oven. The oven gives you so many options with regards to food. It uses both air and radiant heat to cook the food but it usually is a slow transmission which means it usually takes longer to cook something as compared to searing, grilling and broiling. As said earlier, not all types of cooking are for everything. Roasting is good for something that is thick or irregular shape such as a baked potato or a turkey. There are two major difficulties and problems that people face with cooking in the oven or roasting. #1 How long to leave it in the oven and #2 at what temperature. The difficulty allies in getting a nice crust for flavor on the outside while making sure the inside of the item in question is cooked through. Of course without overdoing the outside layers. This is a huge problem with turkeys. Everyone has had a dry piece of turkey or a soggy piece of skin atop of a turkey. These are the two most common reasons for not wanting turkey right? Well Alton Brown as come up with a wonderful way to get crispy skin and nice juicy meat. Follow this and you will have turkey success. I have done this technique multiple times and it always turns out yummy!!!

Start with a turkey. Now you would be surprised how hard it was to find a turkey in August. That is why it took me so long to do this post. Once finding one, of course they only had HUGE 20lb ones. Great. I am going to be eating turkey forever right???? So once I got a turkey, I washed it, took out the "parts" (don't forget this. I did this once and was mortified) and dried it with a paper towel. I then took chicken stock, brown sugar, orange juice concentrate and 1 1/2 cups of Kosher salt and dissolved it over the stove. Once this cooled I placed the turkey in a cooler. (I have also used a really big paint bucket) I then poured the liquid over the turkey and then put a bunch of ice over the top. Put the top back on and went to bed!!!!! This is called a brine. The point of this salty liquid in to move more liquid into the meat proteins so after the cooking you will end up with juicier meat. Which is one of the biggest problems with turkey right. Yucky dry meat.
This is the inside of my ice chest. I promise there is a 20 lb turkey brining away in there. ;)

The next afternoon, after a day of rock climbing (honestly) I came home, removed the turkey and then rinsed and dried it with paper towels. Now I lightly oiled the turkey and then salted and peppered the skin. We all like the crispy skin right? In the past I have then placed some "aromatics" such as lemons, onions, apples, cinnamon sticks, and sage leaves but this recipe called for nothing. In the past I have also topped the skin with cayenne pepper which makes for a yummy and spicy skin.

While working on the turkey I cranked up the oven to 500 degrees!!!!! I then placed the whole turkey into the oven and closed the door. DON'T OPEN THE DOOR NO MATTER WHAT!!! We want that high heat so we can get that crispy skin right? You will hear sizzling, cracking and popping which are all awesome sounds but don't be afraid. DONT OPEN THE DOOR FOR 30 minutes!!!!!! After 30 minutes remove the turkey and turn the oven down to 350 degrees. Look at the skin after just 30 minutes.

Now doesn't that skin look yummy and crispy. DON'T TOUCH IT!!! It is not cooked in the inside. Now we move to the low and slow portion of this turkey party. I created a triangle shaped tin foil cover for the breast of the turkey. I do not like dry turkey and this protects if from getting dried out and the skin becoming burnt. Don't forget the temperature probe in the deepest part of the breast and back in the oven until the temp reaches 161 degrees.

It took my 20lb tukey about 3 hours. :) After the turkey was at reached 161 degrees I removed the bird and placed more foil over the turkey at let it sit for 30 minutes. I wanted to ensure that the turkey stays moist and that when I cut the turkey, all the flavor and moistness (not sure if that is a word) stays in the meat and doesn't run all over the board. :)

And here is the finished product!!! Isn't it make you want it to be Thanksgiving today!!!!

Now for the carving. At my house, I carve the turkey. Thats right, I worked my butt of the make this thing, I want the job of carving it. Not only do I do it because I worked for it but I truly believe that if you don't carve the turkey properly, all of the brining is pointless. Now I know most people start at the breast and just start shaving small pieces of the side. NO NO NO!!! Take the whole breast off of one side. Then slice it the opposite way that our fathers did it when we were kids. (Sorry dad) I am not sure why, (I am sure there is some science to it but I have already had 2 drinks tonight so I am a little tired) but trust me. It is soooooo much better. Here is what it looks like.

And the finished plate with of course.... mash potatoes. I know, no veggies but it is the first day of football which at our house is basically another holiday!!!!
So here are the keys to "roasting" a perfect bird...

1. Brine!!!!!!
2. High heat first to make the skin crispy
3. Low and slow WITH a temp probe.
4. Let sit for at least 30 minutes prior to touching. (this includes taking a little bit of skin off Symon)
5. Carve correctly.

Have you ever made a turkey not during thanksgiving? After this experience and the amount of yummy turkey sandwich leftovers I have had I am planning on doing it again soon. I want to hear about your horror turkey stories so we all can learn from them!!!!

Wednesday, July 27, 2011

More Shrimp Please!!!

So its Monday afternoon, you are exhausted from a long weekend of working/playing or whatever you did. You don't want to just snack for dinner but don't feel like "making dinner". This is the perfect meal for you. Shrimp. Ok so shrimp doesn't sound easy but in this case it is soooo easy. I love shrimp and grew up eating it. Usually covered in butter. This is a great lower calorie alternative. I have to be honest that I have never broiled shrimp but it usually only takes a couple of minutes. I couldn't believe it. I started with defrosting 1 lb of frozen large pealed and deveined shrimp. I usually buy fresh but in this case I had some in the fridge. Yeah!!!!! I made my makeshift broiling pan and placed the shrimp onto to pan making sure they are not touching.
Then you simply drizzle oil (I used canola) over them and then top with salt, pepper and Old Bay seasoning. Have you ever used Old Bay seasoning. This was a first time for me. I knew it was common to use in fish. I was interested to know what the seasonings were so I could see if I could make my own. It says, "various seasonings". Great?! I thought. :) I then sprinkled 4 minced cloves of garlic on top. Here the shrimp are seasoned. In the mean time I cranked up my oven to 500 degrees (broil) and placed the rack 5 inches from the heat.
Into the oven for 2 and then remove. At this point they were slightly pink and starting to curl. While cooking, mix panko bread crumbs, parsley, and lemon juice. Of course I didn't have enough lemon juice so mine was lemon and lime juice. :) After the two minutes, remove shrimp and toss in the bread crumb mixture. I placed them back onto the broil pan and then back into the "broiler" for 5 minutes. That's right. Done in 7 minutes!!!! Aren't they pretty and "fancy" looking.
Since I was in this exact busy weekend situation, I served with left over couscous (with bell peppers and green onions) and frozen peas. I was done in 15 minutes. And that was with Reagan and Ryan hanging on me the entire time!!! Not bad!!! Here is the finished product.
The shrimp were really flavorful. They tasted full of flavor just like they had been cooked in butter and garlic but in fact it was only garlic and a little oil. A much healthier alternative. I ate 11 shrimp for only 75 calories!!! WOW. That equals more desert right? Actually I was full so I didn't even need desert. :) Symon and I loved the taste. I felt they may have been cooked a little long because they were slightly tough. Symon said they were awesome! Reagan ate most of them and Ryan ate his "4 bites" as always. :) Overall, I would make these again and maybe with a big plate of pasta. YUMMY!!!
So this is the last of the broiling applications. Next up Roasting. Yummy!!!! What do you broil that I didn't. Let me know. I love the broiling application and am planning on using it a lot more.


Thursday, July 7, 2011

Chicken on a Stick Round Two!!!

Chicken on a stick round two. Ok, so if you remember my earlier chicken on a stick blog, you will remember how horrible and inedible the chicken was that time. I was bound to make this better!!! This was a two day process again so to start I created a peanut flavored paste to marinate my chicken. The first thing was to toast some coriander seeds. I LOVE CILANTRO!!! I could put it on everything. Coriander seed is what cilantro comes from. The goal was to toast the coriander seed and cumin seed in a dry pan on high heat until smoking. I could not find cumin seed whole anywhere so I opted for just ground cumin. I placed the coriander seed in the dry pan on high heat. I was really afraid of burning so I constantly moved the seeds around in the pan. The toasting only took 1-2 minutes. That seems so silly to heat a pan for 1-2 minutes so hopefully it really makes a difference.

I then added these toasted seeds to the other spices which included grounded cumin seed, cinnamon, salt, sugar and placed them into the mortar and pestle. Do you know what this is? This is a little bowl and a stick in which you grind up spices and other things. Here is Reagan helping me make the spice mix while Ryan was at school. I needed lots of encouragement because I was so worried it was going to be gross like last time. :)

I then placed a 1/2 cup of peanuts into the food processor and then added the spices and ground it into a bread crumbs consistency and then while pulsing I added canola oil and sesame seed oil. This created a paste. It smelled good and there was no gross factor yet. :)
2 lbs of chicken breast, cubed into 1 inch cubes and then I placed the paste onto the chicken. I was grateful that I didn't have to pound flat the chicken like last time which resulted in mushy chicken. I said a quick prayer, covered and then placed it into the fridge for 24 hours.
The next day I got the chicken out and skewed them onto bamboo skewers. Now there is a big debate if you should use metal or bamboo skewers. If you use bamboo skewers you are suppose to soak them in water first so prevent burning. I guess this only matters if you care what they look like. I never soak the skewers because I just don't care if they are burnt. It is important to remember that if you soak them, and they place them in the fridge it will still burn. FYI. I always use bamboo skewers so I don't have to do more dishes and my children most likely would use the metal ones as weapons and I probably could get in trouble for that. Here are my skewers ready for the upside down grilling. (remember that is what I call broiling) :) Alton Brown does state that you can grill them but I thought this was in the broiling section!! Seriously please don't confuse me.

I cranked up the broiler to 500 degrees (while its 110 outside) and placed the chicken about 4 inches from the heat. The recipe did not give me a certain amount of minutes so I just turned after about 6-7 minutes and then broiled on the other side. I then removed. They were smelling really good. I was getting hopeful that they were going to be awesome. Reagan really enjoyed "helping" me turn them in the oven by watching me. Here are the chicken pieces after broiling and then letting them sit. My hubby was running late. :)
I served with white rice and green balls (peas) which was Ryan's choice for veggies. I thought since Reagan helped me cook this one, I would take the finished product picture on her Elmo plate. I took it off the skewer for obvious danger issues.

Results: The rice and peas were good. :) Ok so that is not a good way to start. The chicken had good flavor but I felt that the chicken was slightly over cooked. It did have a great crust on it. I really liked the peanut flavor. Because this was a paste and not a marinate I think it had less moisture. I was very VERY happy that these were not mushy peanut chicken like last time. Funny enough Ryan ate his 4 bites, since he is four and that was it. He did not complain but said, "he was full". Reagan refused to eat the chicken unless it was on the stick and then ate the whole thing like corn on the cob. I would have taken a picture but we are currently potty training which has led to Reagan not wanting to wear any clothes at all. I did not want anyone seeing my naked baby. Ok, I don't care but Symon wants her to have some modesty. :) Next up is our last broiling application... Shrimp!!! Have you tried any of my techniques or recipes that I have shared on here? Let me know and how they turned out. Please respond!!! I want to know what you think.


Tuesday, June 28, 2011

Here Fishy Fishy!!!!

I am from the Monterey, California area so I grew up eating fish. Salmon, Shrimp, Crab, Bass etc. etc. I love fish so when I saw this recipe I thought it was going to turn out awesome. It looked pretty easy but in fact it was harder than I thought. Here we have a fish appetizer called Tres Amigos. I don't really get the name besides that it has 3 different kinds of fish. The first step is to make a compound butter. A compound butter is butter that is flavored with anything. It is used as a flavor agent. This was my first time making or using a compound butter but my Dad has made them in the past to put on a steak and it was awesome. The first step was to bring 1 lb of butter to room temperature. Nothing like a little butter to start right? I then chopped up a shallot finely and sweat it in some olive oil over a medium skillet. Now I have not used shallots very often but find that they look like a really big brown garlic. It tastes more like an onion than garlic and has a very mild flavor. This is what it looks like.
Now there is a difference between saute and sweat. When you put the onion into the pan and you hear that sizzle stop because you are sauteing. To sweat is to bring the liquid out and therefore is a very slow process but it makes the flavor more rich. I then added white wine and then let it reduce until "dry" which means no liquid left in the pan.


Then I took it off the heat and folded in some parsley. Flat leaf Italian parsley to be exact. Now I am not a fan of parsley and especially curly parsley. It must be from all of those days working at Applebee's putting that limp green on every plate. I then took the yummy pound of butter and put it into the mixer and added salt and pepper. I then poured the shallot mixture into the butter and mixed and then folded the home grown basil into the butter.
I then placed the butter onto some wax paper. Well, it called for wax paper but all I had was parchment paper, and then I rolled it into a log shape and put it into the freezer for the night.

Now time for the fishy.... Scallops, salmon and halibut to be exact. I was in luck that Bashas had both fresh Scallops and Salmon. Of course for a ridiculous price but its all in the name of science right. I actually had some halibut in my freezer so on I went. For you fish virgins, the white fish on the left is the halibut and the one on the right is salmon. Both yummy.

I bought 1/2 a pound of each and then attempted to slice them into four eight strips which is ALOT harder than it seems. I am not sure if it is because I have crappy, not sharp knives or what but I ended up having to saw the fish which in turn made it mushy and not pretty. This in turn made the rest of the process very VERY difficult.

The goal was to create thin strips and then to layer the strips, one halibut and then one salmon to wrap around the scallop. Do you know what a scallop is???? I knew it was some kind of fish, I have seen my mom eat one or two in her time but not exactly sure what kind of "fish" it was. Thanks to wikipedia it is an "abductor" muscle that is housed in a very pretty shell. Yummy :) Actually yes. The goal of this recipe is to create a "rose" like look around the scallop. This is WAY easier said than done. Because of my poor carving skills ( I definitely could not work at a sushi bar) the pieces of the salmon and halibut were not long enough to wrap around the entire scallop. Now thinking about it, I wonder if there are different size scallops and the ones I used were too big. Here is what mine turned out to look like.
As I said before, I do not have a broiling pan so as you can see I have my makeshift one. :) I then cut a small slice of the compound butter log and placed a slice on each scallop. I then placed it into the broiler for 8 minutes.

Now AB states to serve the fish medium rare which is a little scary to me. I know some people eat raw fish but on this day, I guess I wasn't up to testing the limits of my stomach. On another note, I did just tried Sushi for the first time which has made me love fish more and more. Don't be scared if you haven't. It is amazing!!! Ok, that was my rant for today. So because I was scared of raw fish, I cooked it for another 2 minutes. After a total of 10 minutes I removed the fish and served.

Overall I turned out really pretty. I was excited to try it. I am guessing it is meant to be eating in one bite which we both attempted to due but it was difficult which again makes me think the scallops were too big. The fish was "I think" cooked. It was good but I could only eat one or two because it is ALOT of fish for one bite. I think the thing that made it was the compound butter. It was so yummy. I am glad I have an extra log for some steak for chicken next week. :) With regards to taste, it was ok. I would not make this recipe again because I am not confident in my fish cutting skills. I will have to work on that. :) Next up is broiled chicken breast.

One other thing. I finally read and watched the movie Julie and Julia. The book and movie were ok. I was slightly disappointed. Maybe because I was expecting more. Anyways, I am hoping to make this blog a little more exciting. Please join me in giving me suggestions on how to improve. :) I wonder if anyone else is even reading this besides my mom. Hopefully yes. :)


Tuesday, June 21, 2011

Breakfast for Dinner? Hell Yes!!

Now we all know that everyone LOVES breakfast for dinner. This recipe doesn't have to be for dinner but I wasn't about to try to make this just for my kids. Lets face it. It seems like they are not eating anything these days but fruit snacks and ritz crackers. GRRRR. So I decided to make this "breakfast" for dinner. I started with defrosting some frozen spinach and hash browns. I love the way Alton Brown writes his recipes. This recipe was created when he was in college and therefore he states, "Remove hash browns from freezer to a sink full of water to thaw. Go back to bed. Get up half an hour later and drain potatoes". I love this. Since I was making it for dinner, I removed the hash browns from the freezer, into the sink and took the kids swimming. :) I came back and combined the hash browns, defrosted spinach and two eggs together and added salt. Two important steps were done during this. Don't forget to turn on the oven to broil... AKA 500 degrees, move the shelf to the top and put your trusty cast iron skillet in the oven to heat up. You Have Gotten One like I told you right? :) The second important thing is to dry the hash browns and spinach before you combine. The point???? Do you want soggy hash browns. I sure don't. The way that AB suggests to do this is brilliant. Salad spinner. I didn't use to have a salad spinner and thought why did I need one when I could just dry it off with a paper towel right. WRONG!!! I finally got what I thought would be a uni-tasker and learned that it is not only for salad. It worked awesome for getting my potatoes and spinach dry. I will be using it more often now. Here is the mixture before cast iron skillet.


Next I pulled out my skillet from the oven, placed some oil on the bottom and then placed the spinach and potato mixture on the bottom. Love that sizzle!!! I then took some store bought salsa and place it on top and then back into the oven. For 12-15 minutes. Mine was about 14.

Removed the skillet and place some mozzarella cheese on top and then cracked four eggs on top of this mixture. I was very disappointed because the eggs slid to the side and were not evenly distributed. I was more than disappointed. If you know me and my anal ways you would understand. I couldn't very well grab it and then move it back so into the oven, AKA broiler for about 4-5 minutes or until the egg whites set.
Now I know what you are thinking. This recipe is sounding and looking weird right. We were right there with you. But... it smelled really good. Seriously. I was really excited to eat it which is saying a lot because some of these recipes have not been so good. Like chicken on a stick. I still gross out when I look at that pictures from that post. I was slightly afraid of having under cooked eggs so I left it in without checking it for the full 5 minutes. I pulled them out and it was perfect. The eggs whites were sure set.

Now again, remember that this recipe was created by a college student who had no money, had an oven that only broiled and that the rack could not move from the top shelf. Alton Brown at this time only had one pan, that he stored in the oven.... The famous CAST IRON SKILLET. (Have I mentioned how much I love them) So he suggests passing out forks to all party guest and digging in. Now I KNEW that my kids would not eat it like that so I cut it into slices like a pizza. Here is where I was sad because I could not cut them perfect so each person could get an egg. Not sure how I could have made this work better. But here was Symon's piece.
It was actually really good. Alton brown also suggests serving with a flat left over beer. Both Symon and I thought that this would be a great morning breakfast after a night of drinking. Too bad we are way too old for that. :) Symon's egg yoke was completely hard and he loved it. He added some red pepper flakes and Tabasco to heat it up a tad. My egg was still running in the middle which ended up being super good because it made sort of like a sauce over the top. Overall I loved it. You could totally change it up and add bacon or ham or more veggies. Of course Ryan would not even touch it and Reagan ate a couple bites and was done. I will totally be making it again. What is your favorite hang over breakfast. Not drink but food. :) Let me know. Maybe I will start drinking to try them out. I doubt it. :) Next up... more fish... broil style.

Thursday, June 16, 2011

Broiling 101

Time to get your broil on. Broiling is just like grilling up side down. Think about it.
Step 1: Place item to broil on broiling pan. (Now if you don't know what a broiling pan is, look under your oven for that pan that came with the oven. The one that you never use. It looks like a pan with a grate over it) This is just like grilling.
Step 2: Place the item really really close to the heat source in your oven. Mine is on the top.
Step 3: Broil!!!!
Just like grilling but the heat source is on top of the food. There are a couple of pros to boiling verses grilling.
1. No smoky taste. (if you don't like that)
2. No flare ups because the drippings are not dripping onto the heat source.
3. You don't have to go outside. :) ( ok so this is not a big deal for us Arizona folk but I would think that you live in Chicago this make be a plus if you are craving a grilled steak in the dead of winter) Plus turning on the oven to a really high temperature may actually warm your house as well. :) Double bonus. Of course when it is 110 degrees outside. Staying inside might be better anyways right?

The first broiling application is steak. Flank steak which in my opinion is a great cut of meat. Flank steak is a cut of beef that comes from the belly of the cow. Because it is from the belly, the cow does not use these muscles as much as say the back so there is a lot of fat running through the meat. Fat (in meat) equals flavor. Don't you wish it was the same for people. Now I am not one to just eat a big piece of fat (like my hubby) but I really like flank steak. Because it is relativity cheap (for steak) and a large piece of meat, it can serve a lot of people or meals in our case which is why I have cooked it a lot.
The first step is to create the marinade. This marinade was made in my new HUGE food processor. I put one onion, garlic, ginger, white wine, soy sauce, worcestershire sauce, honey and extra virgin olive oil. And don't forget salt and pepper. Go easy on the salt because both soy sauce and worcestershire sauce has a lot of salt in it. We pretty much ALWAYS have these ingredients in our house which I was very happy to see. I put all of these ingredients into the processor and chopped it up into a smooth paste/liquid. I put the steak into a zip lock bag and poured the marinate into the bag and into the fridge it goes for the next night. :)


In the afternoon before cooking I took the steak out to let it come to room temperature. I then took the steak out of the bag, wiped off some of the marinade and the placed it on a rack to let it really come to room temperature and dry a little bit.

Then I turned on the oven to 500 degrees or your broil on your oven and then move the rack to the top of the oven. You want the item for broiling within 2 inches of the heat source. And really REALLY 2 inches. (I did not do this :( ) Then let it warm up. Place the steak on the broiling pan and into the oven. Here was the bad news. I do not have a broiling pan. Obviously the person who lived here before us took it with them. I made a makeshift pan by putting a cooking rack on a cookie sheet with foil under it for easy clean up and place it into the oven. After 4 minutes on one side you flip. When I flipped mine, it definitely was not cooking so after the 4 minutes I moved my meat up to the very VERY top. After another 4 minutes and turned. After 8 minutes (or 12 in my case) I removed the steak and let it rest for 5 minutes.

After resting for 5 minutes I cut. On one side of the steak was a perfect medium rare and the other 1/2 was rare!!! One side had a beautiful crust on it and the other rare side did not. I served the med rare pieces with garlic toast and peas or green balls as they are called at our house. Symon and I both enjoyed the steak but found it better if you ate a piece of steak with a piece of garlic bread because it added the crunch factor. Which means added texture in food language. Almost like an open steak sandwich. It was really good. I really liked the marinade flavor. Both Symon and I felt that if we had cooked it closer to the heat source then we could have gotten the crust on the steak that we liked.

The best part of this steak was the next day I used the rare pieces and sautéed them with red and yellow bell peppers and some spices and placed into a tortilla. Now lets face it. EVERYTHING is better in a tortilla right? :) Give me your thoughts on broiling and what your favorite thing is to broil. :) Next up.... breakfast.